Hero sections are easier to maintain when editors can change the actual content directly in the WordPress editor. A fixed set of fields works for some designs, but a hero often needs flexible text, buttons, images, and layout changes from one page to another.
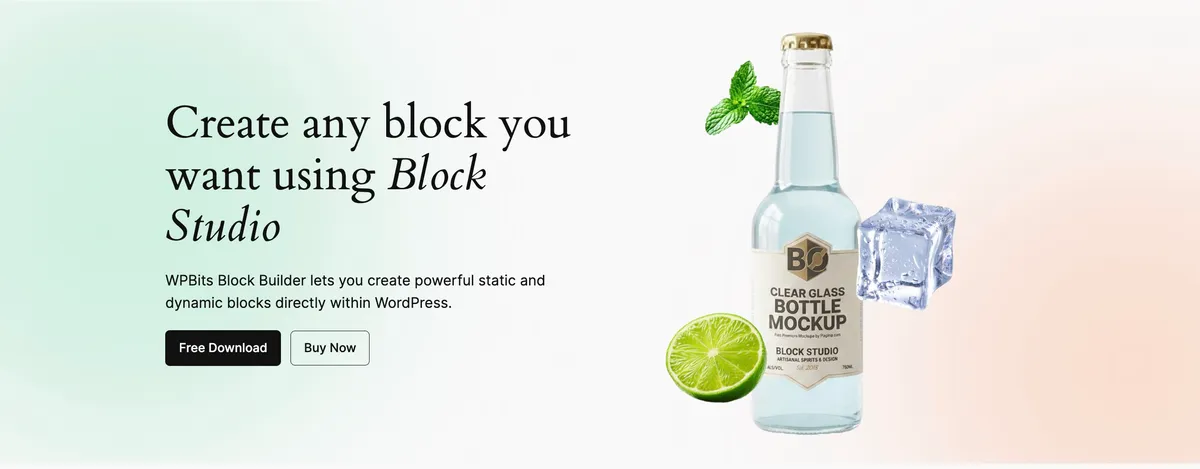
This tutorial shows how to create an Animated Hero Section block in WPBits Block Studio using InnerBlocks. The block itself does not require any attributes. Instead, the default InnerBlocks template gives editors a polished starting layout, and they can edit the nested heading, paragraph, buttons, groups, and images like normal Gutenberg blocks.
The final block gives editors a ready-made hero structure while still allowing them to customize the content inside the block editor.
Why Use InnerBlocks for a Hero Section?
InnerBlocks are useful when the block should control the outer structure, but the content inside should remain editable with native WordPress blocks.
For this hero section, InnerBlocks let you provide:
- A reusable
Animated Hero SectionGutenberg block - A default layout with groups, heading, paragraph, buttons, and images
- Direct editing for the nested content in the block editor
- A clean place to add CSS animation later
- Optional block attributes only when you need settings such as enabling or disabling animation
The important distinction is that this block does not need custom content attributes. The content lives inside the nested blocks.
Requirements
Before you start, make sure you have:
- WordPress 6.0 or newer
- WPBits Block Studio installed and activated
- Access to the WordPress admin
For broader product setup and feature references, see the WPBits Block Studio documentation.
Step 1: Create a New Block
Open the WordPress admin and go to Block Builder. Create a new block for the hero section.
Use these settings:
| Setting | Value |
|---|---|
| Block Name | animated-hero-section |
| Block Title | Animated Hero Section |
| Description | Display a flexible animated hero section using InnerBlocks. |
| Category | design |
Keep the block name descriptive because it becomes part of the generated block identity and wrapper class.
Step 2: Leave Attributes Empty
This version of the block has no required attributes. The heading, paragraph, buttons, and images will be nested blocks, so editors can manage them directly inside the WordPress editor.
If you want to add controls later, use attributes for options that affect behavior instead of duplicating content fields.
For example, you could add an optional animation setting:
| Setting | Value |
|---|---|
| Attribute Name | enableAnimation |
| Control Type | toggle |
| Label | Enable Animation |
| Default Value | true |
That type of attribute is useful because it controls the block presentation. The editable content should still stay inside InnerBlocks.
Step 3: Enable InnerBlocks
Open the InnerBlocks tab for the block and enable InnerBlocks.
After enabling InnerBlocks, the block can contain other blocks in the editor. You can also define a default starter template so the first inserted block already has the hero layout.
Step 4: Configure the InnerBlocks Template
In the InnerBlocks tab, find the Default Template section and click Configure Template.
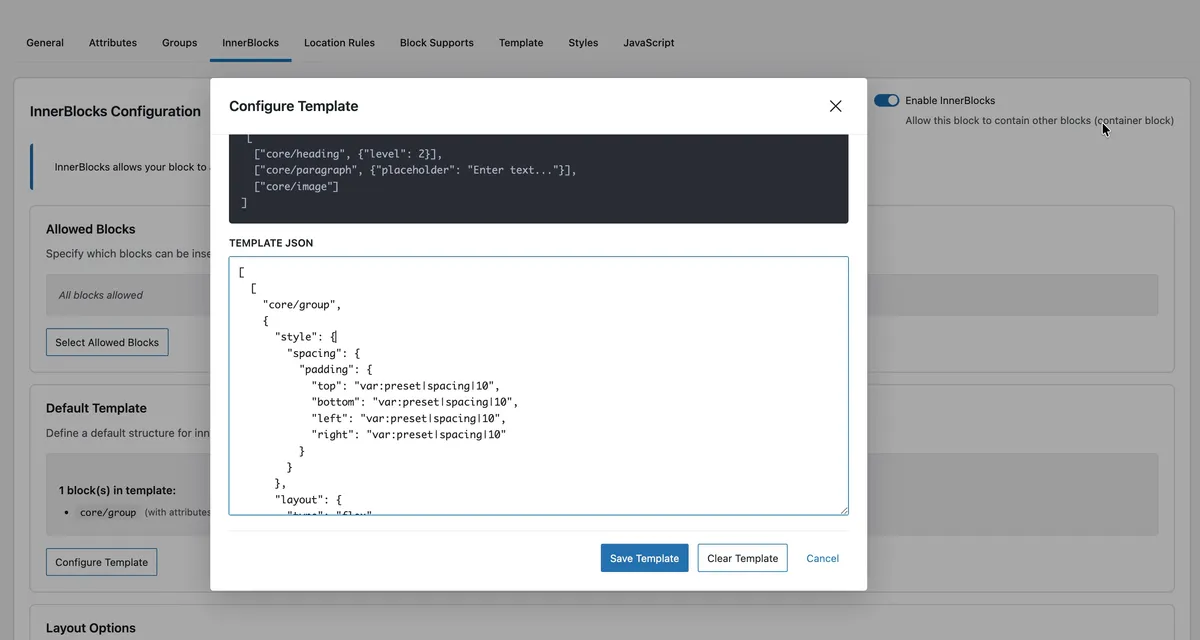
Add the template JSON below.
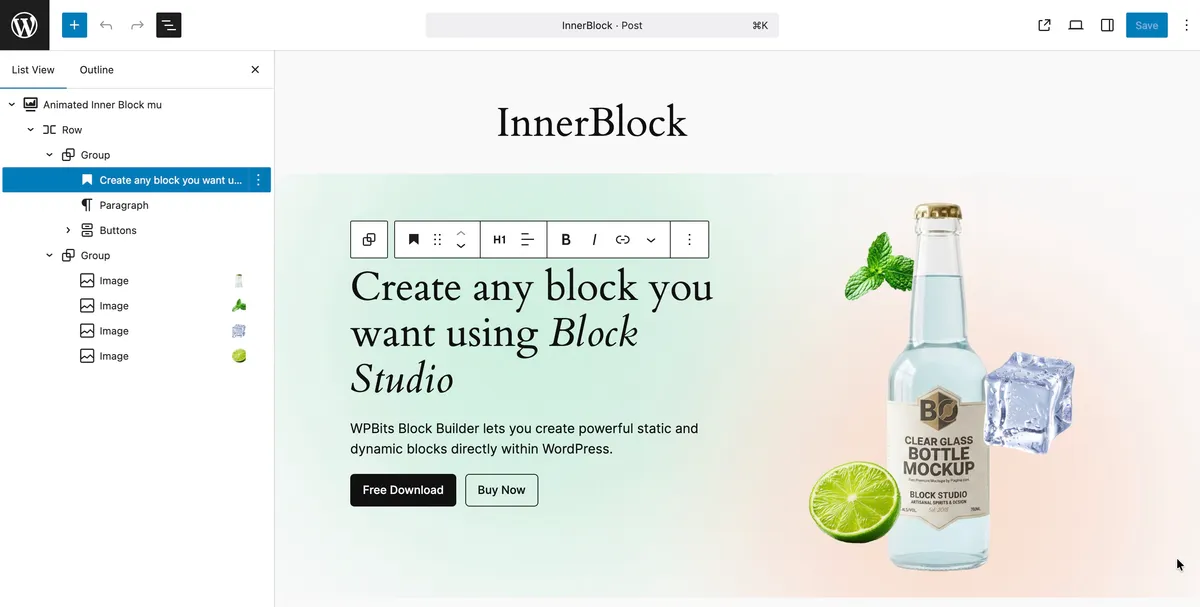
[ [ "core/group", { "style": { "spacing": { "padding": { "top": "var:preset|spacing|10", "bottom": "var:preset|spacing|10", "left": "var:preset|spacing|10", "right": "var:preset|spacing|10" } } }, "layout": { "type": "flex", "flexWrap": "nowrap", "verticalAlignment": "center", "justifyContent": "space-between" } }, [ [ "core/group", { "layout": { "type": "constrained" } }, [ [ "core/heading", { "level": 1, "content": "Create any block you want using <em>WPBits Block Studio</em>" } ], [ "core/paragraph", { "content": "WPBits Block Studio lets you create powerful static and dynamic blocks directly within WordPress." } ], [ "core/buttons", {}, [ [ "core/button", { "text": "Free Download", "className": "is-style-fill" } ], [ "core/button", { "text": "Buy Now", "className": "is-style-outline" } ] ] ] ] ], [ "core/group", { "className": "wpbits-animated-hero__media", "layout": { "type": "default" } }, [ [ "core/image", { "className": "wpbits-animated-hero__image wpbits-animated-hero__image--primary" } ], [ "core/image", { "className": "wpbits-animated-hero__image wpbits-animated-hero__image--accent" } ], [ "core/image", { "className": "wpbits-animated-hero__image wpbits-animated-hero__image--accent" } ], [ "core/image", { "className": "wpbits-animated-hero__image wpbits-animated-hero__image--accent" } ] ] ] ] ]]This template creates the starter content shown in the editor:
- The outer
core/groupcontrols the main hero layout. - The first nested group contains the editable heading, paragraph, and buttons.
- The second nested group contains the editable image blocks.
- The image blocks include class names so you can target them later with CSS animations.
- Editors can still replace, move, duplicate, or remove the nested blocks after inserting the hero.
Step 5: Add the Block Template
Open the Template tab and add the block wrapper template.
<section {{ wrapper_attributes|raw }}> {{ innerblocks|raw }}</section>The template outputs the WordPress block wrapper and then renders the nested InnerBlocks content.
wrapper_attributeskeeps the block connected to WordPress-generated classes and supports.innerblocksprints the nested blocks created from the default template.- The
sectionelement gives the hero a semantic outer wrapper.
Step 6: Add the Frontend CSS
Open the CSS tab and add the hero layout and animation styles.
/* ============================================================   Animated Hero — hero-animation.css   Only layout + blob animation + image positioning.   Typography, buttons, colours → theme handles those.   ============================================================ */
/* --- Outer container --------------------------------------- */.wp-block-custom-animated-inner-block:has(.animated-hero-column-left) {  position: relative;  overflow: hidden;  border-radius: 24px;}
/* --- Blob layer -------------------------------------------- */.hero-blobs {  position: absolute;  inset: 0;  pointer-events: none;  z-index: 0;  overflow: hidden;  max-width: inherit !important;  margin: 0 !important;}
.hero-blob {  position: absolute;  border-radius: 50%;  filter: blur(100px);  opacity: 0.52;  will-change: transform;}
.hero-blob-1 {  width: 560px;  height: 560px;  background: #a8e6c8;  top: -160px;  left: -120px;  animation: heroBlobA 10s ease-in-out infinite alternate;}
.hero-blob-2 {  width: 500px;  height: 500px;  background: #f8c4a8;  bottom: -160px;  right: -100px;  animation: heroBlobB 13s ease-in-out infinite alternate;}
@keyframes heroBlobA {  0%   { transform: translate(0px,   0px)   scale(1);    }  30%  { transform: translate(180px, 60px)  scale(1.12); }  60%  { transform: translate(80px,  200px) scale(0.94); }  100% { transform: translate(240px, 30px)  scale(1.08); }}
@keyframes heroBlobB {  0%   { transform: translate(0px,    0px)    scale(1);    }  30%  { transform: translate(-150px, -50px)  scale(1.10); }  60%  { transform: translate(-50px,  -180px) scale(0.93); }  100% { transform: translate(-200px, -20px)  scale(1.07); }}
/* --- Flex row --------------------------------------------- */.wp-block-group.is-nowrap:has(.animated-hero-column-left) {  align-items: center;  min-height: 540px;  position: relative;  z-index: 1;}
/* --- Left column ------------------------------------------ */.animated-hero-column-left {  flex: 1 1 50%;  z-index: 2;}
/* --- Right column ----------------------------------------- */.animated-hero-column-right {  flex: 1 1 50%;  position: relative !important;  min-height: 500px;  padding: 0 !important;  z-index: 2;}
.animated-hero-column-right figure {  margin: 0;}
/* --- Image 1: main cutout --------------------------------- */.animated-hero-image-1 {  position: absolute !important;  top: 50%;  left: 50%;  transform: translateY(-50%) translateX(-50%);  z-index: 2;}
.animated-hero-image-1 img {  width: 140px !important;  height: auto !important;  object-fit: cover;  display: block;}
/* --- Floating images 2 / 3 / 4 ---------------------------- */.animated-hero-image-2,.animated-hero-image-3,.animated-hero-image-4 {  position: absolute !important;  z-index: 4;  width: auto !important;}
.animated-hero-image-2 img,.animated-hero-image-3 img,.animated-hero-image-4 img {  width: 120px !important;  object-fit: cover;  border-radius: 10px;  display: block;}
.animated-hero-image-2 {  top: 12%;  left: 25%;  z-index:-1;  animation: floatCard 5s ease-in-out infinite;}
.animated-hero-image-3 {  bottom: 30%;  right: 14%;  animation: floatCard 7s ease-in-out infinite;  animation-delay: -2s;}
.animated-hero-image-4 {  bottom: 8%;  left: 16%;  animation: floatCard 6s ease-in-out infinite;  animation-delay: -4s;}
@keyframes floatCard {  0%, 100% { transform: translateY(0px);   }  50%       { transform: translateY(-12px); }}
@media (max-width:768px){  .wp-block-custom-animated-inner-block-wrapper > div {    display: flex !important;    flex-direction: column-reverse  !important;  }
  .animated-hero-column-right{    width: 100%;  }
  .animated-hero-column-left{    text-align: center;    align-items: center;    justify-items: center;  }}
The CSS handles the visual structure and motion for the hero section.
- The outer block wrapper becomes a clipped hero canvas with rounded corners.
.hero-blobs,.hero-blob-1, and.hero-blob-2create the animated background color movement..animated-hero-column-leftand.animated-hero-column-rightcontrol the two-column InnerBlocks layout..animated-hero-image-1positions the main image in the media column..animated-hero-image-2,.animated-hero-image-3, and.animated-hero-image-4position and animate the smaller floating images.- The mobile media query stacks the content and media columns so the hero remains usable on smaller screens.
Step 7: Add the JavaScript for Animations
Open the JavaScript tab and add the script below.
/* ============================================================   Animated Hero — hero-animation.js   Covers: frontend + Gutenberg block editor (iframe canvas)   ============================================================ */(function () {
  /* ── Core inject function ─────────────────────────────────     Accepts any document object (main page or editor iframe)  */  function injectBlobs(doc) {    const leftCol = doc.querySelector('.animated-hero-column-left');    if (!leftCol) return;
    /* Find the outermost .wp-block-custom-animated-inner-block       that is an ancestor of the left column                   */    const container = leftCol.closest('.wp-block-custom-animated-inner-block');    if (!container) return;
    /* Already injected? skip */    if (container.querySelector('.hero-blobs')) return;
    const blobLayer = doc.createElement('div');    blobLayer.className = 'hero-blobs';    blobLayer.innerHTML =      '<div class="hero-blob hero-blob-1"></div>' +      '<div class="hero-blob hero-blob-2"></div>';
    container.insertBefore(blobLayer, container.firstChild);  }
  /* ── Frontend ─────────────────────────────────────────────*/  function initFrontend() {    injectBlobs(document);  }
  /* ── Gutenberg editor iframe ──────────────────────────────     The editor canvas is an <iframe>; we need its contentDocument.     We poll until the iframe exists and its DOM is ready,     then inject and re-inject on every block change via     MutationObserver so it survives block add/remove/reorder. */  function initEditor() {    /* Only run when wp & wp.blocks exist → we're in the editor */    if (typeof wp === 'undefined' || !wp.blocks) return;
    const SELECTORS = [      'iframe[name="editor-canvas"]',      'iframe.editor-canvas__iframe',      'iframe[title="Editor canvas"]',    ];
    function getEditorIframe() {      for (const sel of SELECTORS) {        const frame = document.querySelector(sel);        if (frame) return frame;      }      return null;    }
    let observer = null;
    function watchEditorDoc(iframeDoc) {      injectBlobs(iframeDoc);
      if (observer) observer.disconnect();      observer = new MutationObserver(function () {        injectBlobs(iframeDoc);      });      observer.observe(iframeDoc.body, { childList: true, subtree: true });    }
    function tryAttachToIframe() {      const frame = getEditorIframe();      if (!frame) return false;
      const iframeDoc = frame.contentDocument ||        (frame.contentWindow && frame.contentWindow.document);      if (!iframeDoc || iframeDoc.readyState === 'loading') return false;
      watchEditorDoc(iframeDoc);      return true;    }
    /* Poll until the iframe is ready (it loads async) */    let attempts = 0;    const MAX_ATTEMPTS = 120; // 60 s max    const poll = setInterval(function () {      attempts++;      if (tryAttachToIframe() || attempts >= MAX_ATTEMPTS) {        clearInterval(poll);      }    }, 500);
    /* Also catch iframe reload events */    document.addEventListener('load', function (e) {      if (e.target && SELECTORS.some(function(sel) {        return e.target.matches && e.target.matches(sel);      })) {        const iframeDoc = e.target.contentDocument;        if (iframeDoc && iframeDoc.body) watchEditorDoc(iframeDoc);      }    }, true);  }
  /* ── Boot ─────────────────────────────────────────────────*/  function boot() {    initFrontend();    initEditor();  }
  if (document.readyState === 'loading') {    document.addEventListener('DOMContentLoaded', boot);  } else {    boot();  }
})();
The script adds the animated blob layer without requiring editors to manage extra blocks.
injectBlobs(doc)finds the hero block and inserts the background blob elements once.initFrontend()runs the injection on the public frontend.initEditor()also runs inside the Gutenberg editor iframe so the editor preview matches the frontend.- The
MutationObserverwatches block changes and restores the blob layer if the editor re-renders the InnerBlocks content. - The boot function waits for the DOM, then starts both the frontend and editor initialization paths.
Step 8: Save and Test the Block
Save the block, then open a page or post in the WordPress block editor.
Insert Animated Hero Section and confirm that the starter InnerBlocks layout appears automatically. Update the heading, paragraph, buttons, and images to make sure the nested blocks remain editable.
Check that:
- The block inserts with the expected starter layout
- The heading, paragraph, and buttons can be edited directly
- The image blocks can be replaced with media from the library
- The List View shows the nested block structure clearly
- The frontend renders the nested InnerBlocks content
Practical Extensions
Once the base block is working, you can extend it with optional settings.
Useful additions include:
enableAnimationto turn the animation on or offanimationStyleto choose between fade, float, or slide effectsmediaPositionto switch the image group between left and rightbackgroundStyleto provide predefined background treatmentslockTemplateif you want editors to edit content but keep the same structure
Keep those options focused on presentation and behavior. The content itself should stay in InnerBlocks so the editor experience remains flexible.
Final Result
You now have a reusable animated hero section block powered by InnerBlocks. The block provides a structured starting point, but editors still work with familiar WordPress heading, paragraph, button, group, and image blocks.
That balance is what makes InnerBlocks useful for hero sections: the design system can provide the structure, while editors keep control of the content.